


Overview
Content Restriction allows you to control which contacts can view specific pages, posts, or any other content on your WordPress site. Access is granted or denied based on Groundhogg’s full contact filter system — the same powerful segmentation used across broadcasts and flows — so you can restrict content by tags, opt-in status, custom fields, purchase history, or any other contact data.
You can download this add-on from the Groundhogg website or as part of a plan and install it on your website.
How It Works
When a visitor lands on a restricted page, Groundhogg checks whether the current contact (identified via tracking cookie) matches the filtering rules you have defined. If they match, they can see the content. If they do not match — or if no contact is identified — they are redirected to the URL you specify.
Two important behaviours to know:
- Administrators bypass restriction. Any WordPress user with the ability to edit posts can always view restricted content, so you can safely preview and test restricted pages without being redirected.
- Restricted posts are hidden from archives and loops. In addition to protecting direct visits, restricted content is also excluded from post lists, archive pages, and any other WordPress query where the visitor does not meet the requirements. It will not appear in search results or category pages for visitors who lack access.
Setting Up Content Restriction on a Page or Post
Content Restriction can be applied to any post type — pages, posts, custom post types, or any other content. Open the post for editing in the WordPress editor and scroll down to find the Content Restriction metabox.
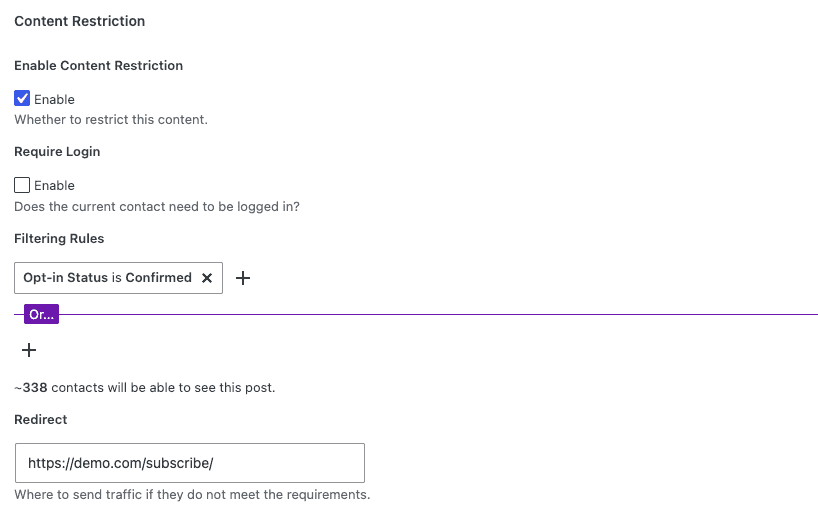
Note: If you are using a page builder such as Elementor, configure the Content Restriction settings from the default WordPress page editor rather than inside the page builder interface.
The metabox has four sections:
1. Enable Content Restriction
Check the Enable box to activate restriction on this post. When unchecked, the post is publicly accessible regardless of any other settings in the metabox.
2. Require Login
Check the Enable box to require the visitor to be logged in to a WordPress account. If checked and the visitor is not logged in, they will be redirected immediately without checking any filtering rules.
3. Filtering Rules
The Filtering Rules section uses Groundhogg’s contact filter builder — the same system used to filter contacts in broadcasts and flows. Add one or more filter groups to define who is allowed to view the content.
Any contact who matches the filters will be granted access. Contacts who do not match — and visitors for whom no contact record is identified — will be redirected.
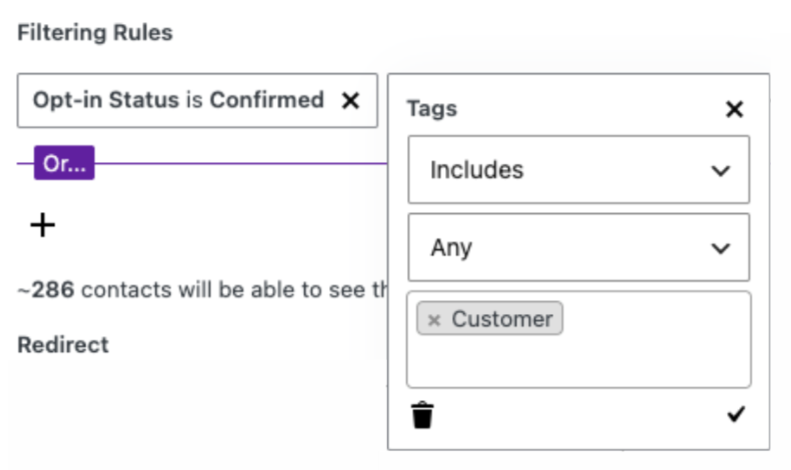
You can build complex access rules using any available contact filter, including:
- Tags (has tag, does not have tag)
- Opt-in status
- Custom meta fields
- Purchase or membership data (if ecommerce integrations are active)
- Any other Groundhogg contact filter
Leave the Filtering Rules empty to allow any identified contact to view the content (only the Enable checkbox and Require Login setting will apply).
4. Redirect
Enter the URL you want visitors to be sent to if they do not meet the requirements. If left blank, the post will use the Default Redirect URL configured in the global settings. If no default is set, visitors will be redirected to the site home page.
Save or update the post to apply your content restriction settings.
Global Settings
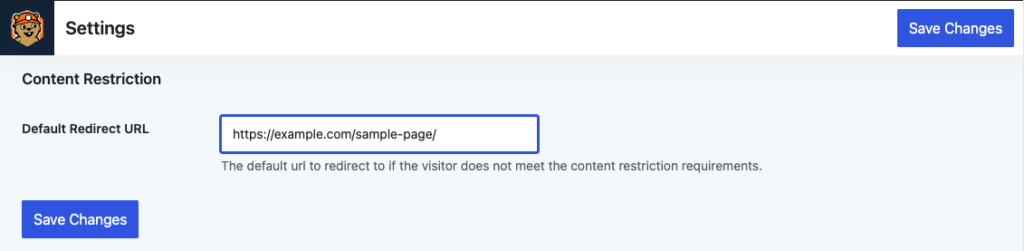
You can set a site-wide default redirect URL that applies to any restricted post that does not have its own redirect URL configured. Find this setting under Groundhogg → Settings → Misc → Content Restriction → Default Redirect URL.
FAQs / Troubleshooting
Q. A visitor is being redirected even though they should have access. What’s wrong?
A. Content Restriction identifies contacts using the Groundhogg tracking cookie. If the visitor’s tracking cookie has not been set — for example, if they have not clicked a tracked link or submitted a Groundhogg form in their current browser session — they will not be identified as a contact and will be redirected. Make sure visitors have a way to be identified before they attempt to access restricted content, such as clicking a tracked link from an email.
Q. Can I restrict content by whether someone is logged in, without checking tags?
A. Yes. Enable the Require Login checkbox and leave the Filtering Rules empty. Any logged-in visitor will be granted access, and any visitor who is not logged in will be redirected.
Q. I am an administrator but I am still being redirected. Why?
A. Administrators (users with the edit_posts capability) always bypass content restriction and should never be redirected. If you are being redirected, check that your WordPress user account has the correct administrator role and capabilities.
Q. Does Content Restriction work with Elementor or other page builders?
A. Yes, but the restriction settings must be configured from the standard WordPress post editor, not from inside the page builder. Open the page in the WordPress editor (not Elementor), scroll down to the Content Restriction metabox, and configure your settings there.
Q. Can I restrict custom post types, not just pages and posts?
A. Yes. The Content Restriction metabox appears on all post types, so you can restrict any content on your site.
Q. The Content Restriction metabox is not appearing in my editor. What’s wrong?
A. The metabox is only visible to users who have the view_contacts Groundhogg capability. Make sure your user account has the appropriate Groundhogg role. Administrators have this capability by default.
Was this helpful?
Let us know if this document answered your question. That’s the only way we can improve.